
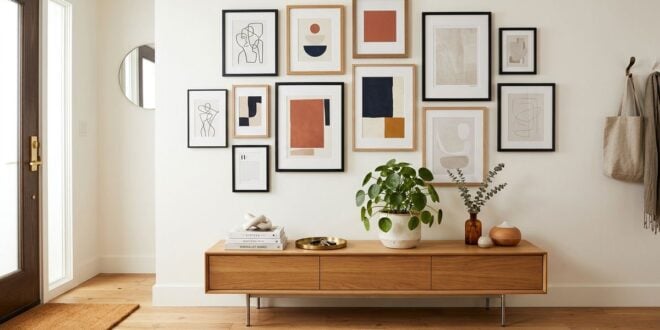
A gallery wall can make mismatched art, photographs, and keepsakes feel intentional. The challenge is not achieving perfect symmetry; it is creating a composition with enough visual connection to read as one group. Planning on the floor and wall first reduces unnecessary holes and last-minute adjustments.
Before arranging anything, check the wall material, likely fixing locations, and weight of every frame. Hanging methods vary, and heavy or valuable pieces may require professional installation.
Choose a unifying idea
Lay out all possible pieces and look for relationships. The connection might be subject, colour, frame material, print style, or personal meaning. Not every item must match, but one repeated element helps the collection feel deliberate.
Readers may also want to visit Money-plans.com. Your furniture width, ceiling height, wall interruptions, and viewing distance should guide the design.
Edit the collection using a few questions:
- Is there a clear focal piece or starting point?
- Do several colours or frame finishes repeat?
- Are the smallest pieces visible from the normal viewing distance?
- Does the group relate to the furniture beneath it?
- Is any fragile item exposed to strong sun, heat, or moisture?
Remove pieces that fight the overall balance. They can be displayed elsewhere or rotated into the arrangement later.
Build the layout at full scale
Measure the available wall and mark the same dimensions on the floor with removable tape. Arrange frames within that boundary. Start with the largest or most important piece, then add medium and small items while keeping gaps reasonably consistent.
You can also visit credit-cafe for more reading. Label each template, mark the hanger location, and attach the paper to the wall with a surface-safe removable method. Step back from different parts of the room to judge height and balance.
The visual center of the group usually matters more than the center of each frame. If the gallery sits above furniture, leave enough relationship to feel connected without crowding the surface. Check doors, switches, vents, lamps, and walking paths.
Match fixings to frames and walls
Weigh pieces rather than guessing. Inspect hanging wires, D-rings, sawtooth fittings, or other hardware for security. Some frames have two fixing points and need careful leveling. Never assume a generic hook is suitable for masonry, plasterboard, tile, or older plaster.
Use a detector appropriately before drilling, but understand its limitations. Pipes and electrical cables may be hidden in walls. If you are uncertain about structure, utilities, or load, stop and consult a qualified person. Valuable art may also need security fittings or conservation advice.
For a related read on this site, see How Early Founders Can Build a Calm Weekly. Verify every measurement yourself before making a hole, because frame hardware is not always centered or installed consistently.
Hang slowly and adjust visually
Install the main piece first, then work outward. Use a tape measure and level, but also step back after every few frames. Walls, ceilings, and furniture are not always perfectly level, so a mathematically exact layout can still look slightly off.
Add small adhesive bumpers to lower frame corners if suitable; they can reduce shifting and protect the wall. Keep leftover paint and a record of fixing locations for future changes. Avoid frequent repositioning until the whole arrangement is visible.
Once complete, photograph the wall and live with it for several days. A minor gap may be less noticeable than it seemed during installation. The strongest gallery walls balance preparation with personality: secure enough to trust, orderly enough to read clearly, and varied enough to feel collected over time.
Before treating plan a balanced gallery wall before making holes as finished, run a small real-life trial. Choose an ordinary day rather than an unusually quiet one, follow the plan, and notice where you pause, improvise, or skip a step. Those moments are useful evidence. They show which part of the system asks for too much time, memory, equipment, or cooperation.
Use the results to make the next version smaller and clearer. Remove a step that adds little value, prepare a necessary item earlier, or assign responsibility explicitly. If several people are involved, ask what they found difficult instead of assuming reluctance. A workable routine should be understandable without one person constantly supervising it.
Keep the revised plan visible or easy to retrieve until it becomes familiar. After several attempts, review whether it saves effort, supports safety, and fits the people who use it. If not, return to the observed friction rather than adding more rules. Life changes, and a method that worked in one season may need a lighter version in another. Success is not permanent perfection; it is having a clear way to notice problems, make a measured change, and restore the routine.